Maintenance
The section describes maintenance procedures for the gas analyzer and components.
Site maintenance schedule
A good site maintenance plan will help ensure more complete data coverage. These recommendations are preventive maintenance—follow them to prevent issues.
| Frequency | Check... |
|---|---|
| When you first deploy the instrument: | |
|
Check the signal strength and record this for a baseline. This will help you determine when the optics should be cleaned. |
|
| Every day or every few days: | |
|
Check the overall performance of the instruments, including the measured values and diagnostic information. This will ensure that you don't lose data (or that you lose less data) if something is wrong. |
|
|
Check the measured values. Air temperature, pressure, sonic temperature, dew point, gas concentrations, covariances and fluxes. Any unexpected readings may indicate an issue. |
|
|
Check the diagnostics. Signal strength, detector temperature, chopper housing temperature, and thermocouples. |
|
| Once per week: | |
|
After installing the new system, start by checking the signal strength once per week. There is no absolute guideline for good or bad signal strength, but 100% indicates very clean optics and optimal performance from the analyzer. If the signal strength has dropped, it is a good idea to clean the optics. For most sites, the maintenance frequency is once every 3-4 weeks. The signal strength limit, below which the instrument readings are compromised, varies due to the spectral characteristics of the contaminants involved. Typically, signal strength values should be maintained in the upper 90’s for consistent performance. |
|
| Once per month: | |
|
Check the zero and span. As you become familiar with your instrument, you will probably find that this does not need to be checked as often. |
|
|
Clean the upper and lower windows of the analyzer. |
|
|
Download all your data and store it to an archive. |
|
|
Check cables for damage. Tighten any loose cable connections. |
|
| Every six months: | |
|
For installations in humid environments, replace the head chemicals every six months. |
|
| Once per year: | |
|
Replace the head chemicals. For most installations annual replacement is sufficient. |
|
| Every two years: | |
|
Check the instrument calibration with one or more span gases. If it is outside the specifications, return the instrument to LI-COR for recalibration. |
|
Cleaning the gas analyzer optical path
Caution: Power off the gas analyzer (disable the power supply or disconnect the power cable) before conducting any maintenance that involves disassembly or disconnecting cables. Disassembling the instrument or detaching or attaching head cables while the instrument is powered on may damage the instrument or result in a loss of data.
The upper and lower optical windows should be cleaned when necessary (visible dirt or stains, or smaller than expected CO2 Signal Strength).

The windows are sapphire, and are extremely durable and resistant to scratches; clean the windows with any mild detergent or glass cleaner. Also, coating the windows with a water resistant windshield type coating (such as Rain-X®) or a high quality automobile type wax may help prevent droplets from remaining on the windows during rainstorms. Mounting the sensor head at a 10 to 15° angle from vertical will help prevent water from pooling on the window (see Figure 9‑1 ).
Replacing SmartFlux Core System fuses
Power for the SmartFlux Core System and the pass-through power supply are protected by fuses. This section describes how to replace a blown fuse. Pass-through power flows through the SmartFlux Core System to pins on ports 1, 2 and 3 to power a connected sonic anemometer. To change the fuses, power off the SmartFlux Core System. Remove the power and data terminal strips. Remove the six screws on the side of the case and remove the case lid.

Caution: Do not damage nearby electronic components when removing fuses. Avoid prying on or applying pressure to board-mounted components.
3.0 Amp fuse for pass-through power

The SmartFlux Core System uses two 3.0 A fuses between the Power IN connector and the serial ports (see Figure 9‑2). One of these fuses is for the power wire to the anemometer or other connected device. The other 3.0 A fuse is for the power return wire and protects the system in case problems such as improper grounding cause a power surge.
If the SmartFlux Core System boots up and has power, but the Power OUT LED does not light up, it is likely that one of the two 3.0 A fuses has failed.
- Measure both 3.0 A fuses with an ohmmeter. If one of them is an open circuit, replace it with the spare 3.0 A fuse.
- Remove the failed fuse and the spare 3.0 A fuse by gently prying under each fuse with a small flat-bladed screwdriver.
- Gently press the good (spare) fuse into the fuse holder. If both 3.0 A fuses are blown, you will need to order another 3.0 A fuse (part number 348-16020).
- Replace the lid and six screws on the SmartFlux Core case.
Note: A blown 3.0 A fuse usually indicates a wiring problem between the SmartFlux Core System and the sonic anemometer or other connected device. Check for proper system grounding and remove possible causes of a short circuit in the power cable for the connected device. Also, while this fuse is rated at 3.0 A, keeping power use at 2.0 A or less will ensure a nearly unlimited lifetime for the fuse.
1.0 Amp fuse
If the Power OUT LED lights up, but the Power IN LED does not light up, it is likely that the 1.0 A fuse has failed (see Figure 9‑2).
- Measure the 1.0 A fuse with an ohmmeter. If it is an open circuit, replace it with the spare 1.0 A fuse (part number 348-13880).
- Remove the failed fuse and the spare 1.0 A fuse by gently prying under each fuse with a small flat-bladed screwdriver.
- Gently press the good (spare) fuse into the fuse holder.
- Replace the lid and six screws on the SmartFlux case.
Note: A blown 1.0 A fuse may indicate a problem with the SmartFlux Core System. If the spare 1.0 A fuse also fails when installed, contact LI-COR support.
Replacing LI-7550 Fuses
Caution: Power off the gas analyzer (disable the power supply or disconnect the power cable) before conducting any maintenance that involves disassembly or disconnecting cables. Disassembling the instrument or detaching or attaching head cables while the instrument is powered on may damage the instrument or result in a loss of data.
Early models of the LI-7550 have one fuse for the power supply. Later models have two fuses—one for the power supply and one for the accessory. To check a fuse, inspect it for evidence that it is burned and use an ohm meter to check the resistance. Resistance of <1 Ω (ohm) indicates that the fuse is OK.

Power Supply Fuse
The power supply is protected by a 5 A 125/250V, 5 × 20 mm fast-blow fuse (part number 439-04214). If the battery or other power source fails to power the instrument, check to see if the fuse has blown.
The fuse is located in the lower left-hand corner, as shown in Figure 9‑3. Replacement fuses (part number 439-04214) are in the spares kit. Use a flat blade screwdriver or your thumb to push down on the fuse holder cap and turn counterclockwise to release the cap.
Accessory Fuse
The accessory uses a 2 A Nano2 SMF Fuse. There is one spare fuse included in the LI-7550. If the heated intake tube will not power on or continuously triggers an error, check the fuse and replace it if necessary.
Replacing the internal chemicals
Caution: Power off the gas analyzer (disable the power supply or disconnect the power cable) before conducting any maintenance that involves disassembly or disconnecting cables. Disassembling the instrument or detaching or attaching head cables while the instrument is powered on may damage the instrument or result in a loss of data.
There are two small plastic bottles, each containing Ascarite II and magnesium perchlorate, in the analyzer housing that keep the optics free of CO2 and water vapor. These bottles should be replaced with new bottles annually (or every 6 months in hot, humid climates). Replacement bottles are available from LI-COR in sets of two (part number 7500-950). If you want to recharge the bottles yourself, see Suppliers for a list of suppliers of Ascarite II and magnesium perchlorate.
Note: Calibration shifts will occur if CO2 or H2O are not kept out of the analyzer housing.
To change the sensor head soda lime and desiccant bottles:
- Remove the chemical bottles.
- The plastic bottles are in the lower analyzer housing in the sensor head. Remove the mounting bracket from the analyzer. Then remove the thumbscrew and thread it into a cap. Pull straight out to remove the plug.


- Remove the lids from the old bottles (these lids have holes in them) and install them on the new bottles.
- Place the Teflon membrane in the lid to keep the chemicals from spilling.

- Insert the new bottles into the analyzer housing cap first. Replace the bottle covers and the cover retention screw and reattach the mounting bracket.
- After installing, allow at least 24 hours (with the instrument powered on) to scrub the housing; otherwise, the instrument may still drift.
- This should be followed by setting the CO2 and H2O zeros. Check the zero again, if possible, after one or two days.

Note: Read the technical note called "Using CO2 and H2O Scrubbers with LI-COR Gas Analyzers" for information about the interactions between scrub chemicals and the air.
See https://licor.app.boxenterprise.net/shared/static/7i418s3uhd2uamoxfmjd.
Software updates
Go to licor.com/support/LI-7500RS/software.html for the latest versions.
We recommend running the most current software at all times, including both the embedded and interface software for the LI-7500RS or LI-7200RS, EddyPro, and embedded software on the SmartFlux Core System. Check the installed version of the embedded analyzer software by clicking the Diagnostics tab at the top of the .
On the support web site, select your instrument, then select Software. Download both the Instrument (Embedded) Software and the Windows Interface Software.
Warning: Read this before updating!
Firmware version 8.9 and newer require USB drives to be installed in the SmartFlux Core System and the LI-7550 for dependable performance. Be sure to install USB drives in both the LI-7550 and the SmartFlux Core System before installing the update. Also:
- Clear data from both USB drives prior to initiating the update. This ensures that there is adequate memory available to perform the update.
- Reapply the LI-COR Cloud or FluxSuite settings after the update is complete.
- Reapply data repository settings after the update is complete.
- To optimize performance of the LI-7550 with the SmartFlux Core System, set RS-232 output to 0 Hz.
Embedded instrument software
To update the embedded instrument software:
- Make sure your gas analyzer sensor head is connected to the LI-7550 Analyzer Interface Unit. Power up the gas analyzer. Connect your computer to the system Ethernet switch (as shown) or to an open Ethernet port inside the LI-7550 using an Ethernet cable with standard RJ45 connectors.
- Note: There must be a USB drive in the LI-7550 USB port. For the best speed and performance, it's best to use a USB drive with no data on it.

- The Instrument (Embedded) Software is a zipped file named something similar to LI-7xxx_embedded-7.0. Unzip the files and save them.
- Double-click the file called update7x00.

- Click Browse... and select the instrument from the list. You may need to allow the application to pass through your computer's firewall.

- Select the gas analyzer from the list and click Update Software.
- The update will take about 5 minutes.
- Note: Do not close the software, let your PC go to sleep, or power off the instrument during the update process. The software will notify you when the update is complete. If the update fails for any reason, repeat steps 2 and 3.
- If you are updating from embedded version 4.x.x or earlier, you must also run the FPGA update. To check if this update is necessary click the Check FPGA button. Note: Do not check the FPGA version until you update the system software.
- If the FPGA update is needed the Update FPGA button will become enabled in the application. The FPGA update takes approximately 10-12 minutes.
- Note: Do not close the software or reset the instrument while the update is taking place. The software will notify you once the FPGA programming is finished.
- After updating the software, check all your instrument configuration settings. The instrument should retain all settings through a software update, but in unusual circumstances, some settings may be lost.
Troubleshooting: Getting an update error? There must be a USB drive installed in the LI-7550 USB port before you can update. Also, if the drive is inserted for the first time, the instrument will take a few minutes to connect with the drive.
Windows interface software update
To install the Windows interface software for the LI‑7500A/RS, LI‑7200/RS, and LI‑7500DS gas analyzers:
-
Get the latest updater from the link above.
-
Double-click the downloaded file to start the installation wizard.
The updater is named something similar to win-GHG-9.0.0.

-
Follow the steps to install the program.
The software includes WinSCP for file transfer. Be sure to install all components. This application is used to configure the LI‑7500A/RS, LI‑7200/RS, and LI‑7500DS gas analyzers.
The new software has the same basic interactions and workflows as the previous version.
SmartFlux Core System software update
To update the SmartFlux Core System embedded firmware:
-
Get the latest updater and install it on your computer.
Double-click the downloaded file to start the installation wizard.

The file is named smartflux-updater-4.2.1.exe. The installed application is called smartflux-updater.
-
Connect the system to your computer with a network cable.
You can use the cable to connect the SmartFlux Core System directly to your computer or network, or you can connect to the eddy covariance system network switch.
-
Launch the updater, select the unit to update, and then click Update Software....

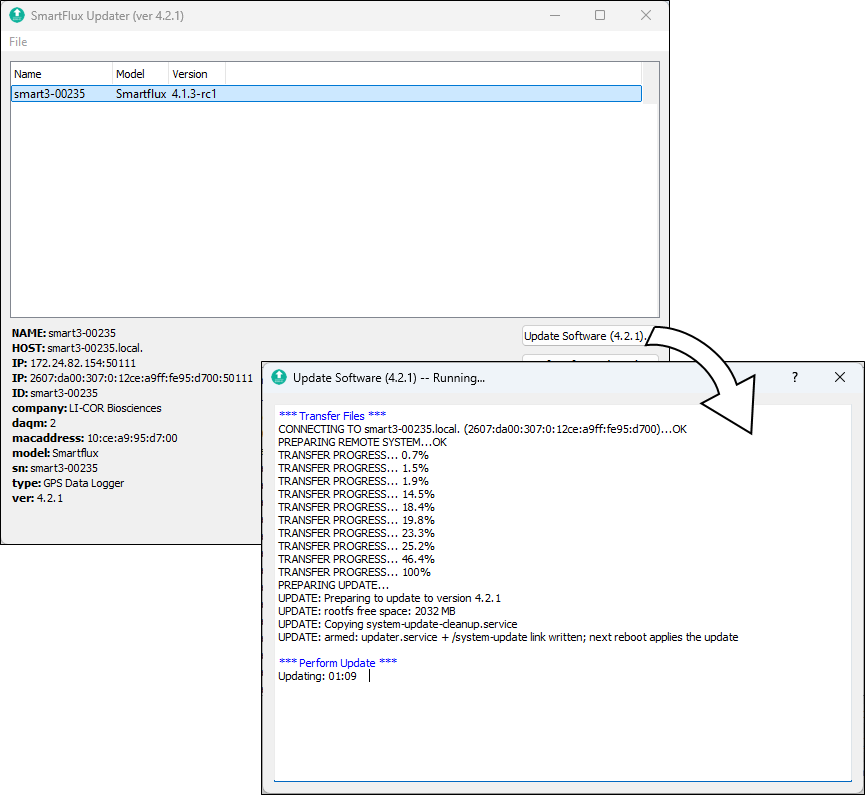
The update will take several minutes to finish. The application will notify you when it is done. Do not turn off the SmartFlux Core System or the computer while the update is in progress.
Note: Serial numbers are not changed by the update. Although the distinction between SmartFlux 2 and 3 Systems is no longer relevant with updated systems, serial numbers will remain intact. For example, a serial number smart3-0235 will not be changed by the update even though the system is now configured as a SmartFlux Core System.
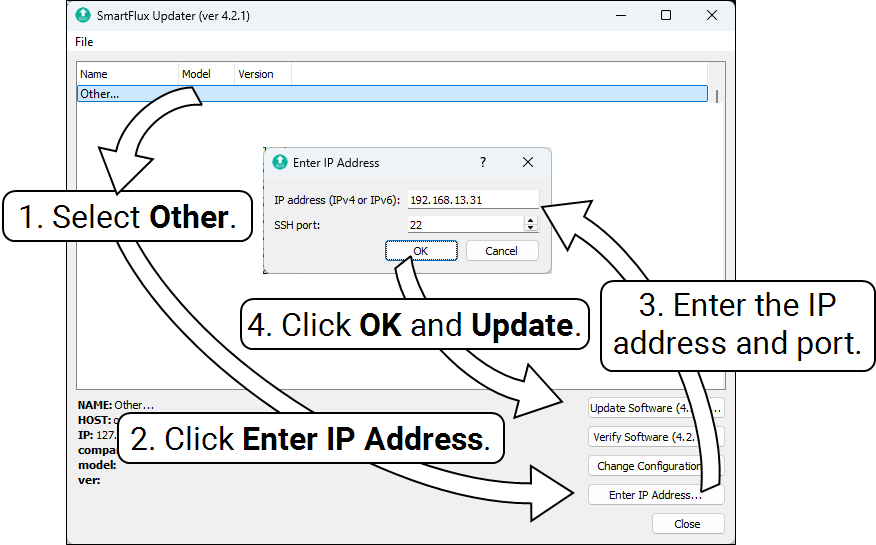
If the SmartFlux 2 or 3 System is on a different local network (for example, it is connected to an RV50X cellular radio), open the updater, click Other..., and then click Enter IP Address. Enter both the IP address of the radio and the port number for the SmartFlux 2 or 3 System. Click OK and then click Update Software.