


Initial configuration
The LI-7200RS Windows software is used to configure the instrument. Go to licor.com/support/LI-7200RS/software.html for the latest version and install it on your computer. Download embedded firmware and interface software for all components in the system. We recommend that you always use the latest software.
1. Power on the system
With everything prepared as described in Initial assembly, the system can be powered on. Provide power (12 or 24 VDC; 4 to 5 amps) to the system enclosure terminals, then turn the breakers to the ON position. Allow several minutes for the instruments to start up, then check the LEDs:
- LI-7550 (inside): Power and Ready LEDs solid when ready.
- Flow Module (inside): Power LED solid when ready.
- SmartFlux: Power IN LED solid; Status LED slow blink when ready.
2. Install an Ethernet cable between the system and a computer

The standard Ethernet cable (616-06116) connects to a computer and the LI-7550 or network switch.
3. Connect with the gas analyzer
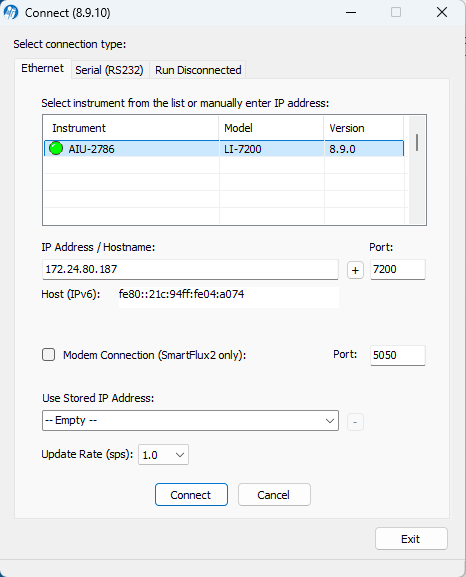
Launch the win-GHG application (called LI-7x00 A RS DS 8.x). Instruments will be listed by LI-7550 serial number (AIU-XXXX). Select one and click Connect.

- If there is a yellow dot beside the instrument (
 ), update the firmware as described in Software updates.
- If you are connecting the instrument to an RV50X cellular gateway, set the IP address as described in the RV50X instruction manual from LI-COR.
4. Connect with the SmartFlux Core System
Click the SmartFlux button. Select the SmartFlux Core System and click Connect.


5. Configure the gas analyzer
These settings are related to the system clock and the operating temperature range.

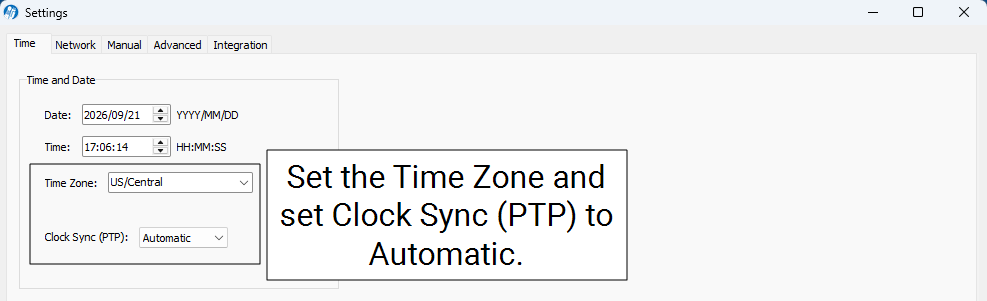
Under Settings > Time, check the time settings.
-
Time Zone: Select the time zone to use for the site. We recommend that you do not adjust the time for daylight saving time to avoid overwriting or creating duplicate files during a switch between standard and daylight saving time.
-
Clock sync (PTP): Set to Automatic. The time and location will be updated when data are received from GPS satellites. When using PTP, the Date and Time are set automatically and offset by the time zone setting.
Caution: The Clock sync (PTP) setting must be set to Automatic or On. Time synchronization of the LI-7200RS, SmartFlux Core System, and LI-7700 are based on the PTP protocol. If PTP is off, the recorded data will be prone to synchronization problems.
Under Settings > Advanced, check the chopper housing temperature setting.
-
Use 5 °C (winter) when the average ambient temperature is below 5 °C. Do not set the chopper housing temperature to 5 °C when the average ambient temperature is above 5 °C.
-
Use 30 °C (summer) when the average ambient temperature is above 5 °C.
Caution: If you change the Chopper Housing Temperature setting, be sure to check the zero and span and adjust them if needed.
6. Connect with accessory components
Additional settings must be configured if you are using the following accessories:
7. Configure the eddy covariance system
Verify your work so far (see Verify the configuration), and then proceed to Field installation, where you'll complete the hardware installation and collect data on the setup. Some of the required information is determined by the site characteristics and instrument arrangement (see Collecting data on the setup). The remaining steps for a basic eddy covariance system are taken in the gas analyzer PC software (see Configuring the eddy covariance system).
Caution: Some settings are required for the SmartFlux Core System to proceed with calculations. If you do not enter this information or enter it incorrectly, EddyPro on the SmartFlux Core System will not calculate fluxes or will compute incorrect results. Required fields are marked as mandatory.
The SmartFlux Core System uses EddyPro express settings by default. If you want to use advanced processing, additional steps must be taken to configure the system. See EddyPro on the SmartFlux Core System for more information about Express and Advanced modes.
Connecting a LI-COR Biomet Data Acquisition System
A LI-COR Biomet Data Acquisition System, Biomet system (Sutron 9210 datalogger), or properly configured Campbell Scientific® CR3000, CR1000, or CR6 datalogger can be connected to the SmartFlux Core System to collect biomet data with the eddy covariance dataset. Biomet data are summarized by EddyPro on the SmartFlux Core System and can be used in the flux calculations.


Select Data Acquisition System (DAqM) to display the LI-COR Biomet Data Acquisition Systems that have been configured for the shared SmartFlux Core System. Select the Data Acquisition System and click Connect.
Note: The LI-COR Biomet Data Acquisition System must be configured through the Blueprint Utility (software) before it will be listed here.
Connecting a Sutron 9210 or Campbell CR3000, CR1000, or CR6
Sutron 9210
Select Sutron 9210 to display a list of Sutron 9210 Dataloggers available on the network (same subnet mask as computer). Select a Sutron 9210 from the list or enter an IP address in the Datalogger IP Address field (networked device on a different subnet from the computer) and click Connect.
CR3000, CR1000, or CR6
Select CR3000, CR1000, CR6, enter the IP address in the Datalogger IP Address field and click Connect. The datalogger IP address is a user-assigned static IP address that is also set in the datalogger software. When you start logging data, data values from the Campbell Scientific datalogger will be logged and summarized in the SmartFlux Core System output. See the Campbell Scientific Dataloggers Installation Guide for instructions on programming the CR3000, CR1000, or CR6 datalogger for the SmartFlux Core System.

Biomet system connection status and data
Connection information and recent data are displayed in the window.
- Connection Status: The right side of the Instrument screen displays the datalogger connection status, IP address, model name, serial number, operating system version, and program name.
- Data: After connecting, click the Data tab to display a list of biomet sensors configured for use with the selected datalogger (under Sensor Name). The list displays the Sensor Properties (Type, Units, and Value) for the selected sensor. Note that the Sensors and Sensor Properties are configured through the datalogger software; this list is for reference only.

Note: Enable the Sync clock setting under Site Setup > Biomet to synchronize the datalogger and gas analyzer clocks. When checked, the biomet system clock will be adjusted to match the LI-7250 clock every 30 minutes.
Refer to the Data Acquisition System or Biomet Station Instruction Manual for more information.
Connecting to an LI-7700
To connect with an LI-7700 Open Path CH4 Analyzer, install an Ethernet cable between the LI-7700 and the network switch. Click the LI-7700 button, or under Site Setup > LI-7700 , click settings ( ) to open the connection window.


Select the LI-7700 from the list or enter an IP address in the LI-7700 Hostname field (for a networked device on a different subnet from the computer) and click Connect. Click Apply or OK.
Caution: To synchronize the LI-7700 clock with the system clock, be sure to configure the PTP time setting in the LI-7700 to Slave or Automatic.
Connecting a PhenoCam camera
Note: The StarDot NetCam SC (PhenoCam) has been replaced by the NetCamLIVE2. The NetCamLIVE2 is a direct replacement and is supported by SmartFlux Core System.
Under the PhenoCam tab, you can connect to a StarDot NetCam SC, NetCamLIVE2, or a CC5MPX digital camera. When connected, images will be posted to LI-COR Cloud. To connect, check the box and select a camera model. Select StarDot netcamsc for either the StarDot NetCam SC or NetCamLIVE2 and then enter the camera IP address in the Hostname field. For the CC5MPX, enter the Hostname and the MAC Address that is printed on the camera's exterior label. Click Apply Camera Settings to connect the camera to the system.

Configuring the system for cellular communication with the RV50X
If you are using a cellular communication system (Sierra Wireless AirLink RV50X), refer to the LI-COR cellular communication instruction manual for full details. Here, we show how to set the gas analyzer IP address, as required for cellular communication. We recommend the following IP addresses with the RV50X.
- Stop data logging.
- Click the Stop button on the software dashboard.

- Configure the LI-7500RS/DS or LI-7200RS for a Static IP Address: Click Settings > Network and enter the IP Address, Subnet Mask, and Default Gateway.
- IP Address: 192.168.13.201, as specified in the LI-COR cellular communication instruction manual.
- Subnet Mask: Typically 255.255.255.0
- Default Gateway: Set this to the local IP address of the RV50X (192.168.13.31).
-

- Reboot the instrument after changing the network settings.
Proceed to configure the RV50X as described in the included documentation.
Connecting to LI-COR Cloud
Any internet-connected LI-COR eddy covariance system (LI-7500DS, LI-7500A/RS, or LI-7200/RS with the SmartFlux Core System) can be connected to LI-COR Cloud. LI-COR Cloud provides online results from the system, configurable email alerts based on specified conditions, and the ability to add collaborators. The components should be running the latest software and firmware for compatibility. To connect your system with LI-COR Cloud:
-
Create a new account or log into your account at www.licor.cloud.
You can start with a trial account if you're not ready to subscribe yet.
-
In win-GHG interface software, provision the SmartFlux Core System.
-
Click the SmartFlux button and select the LI-COR Cloud tab.
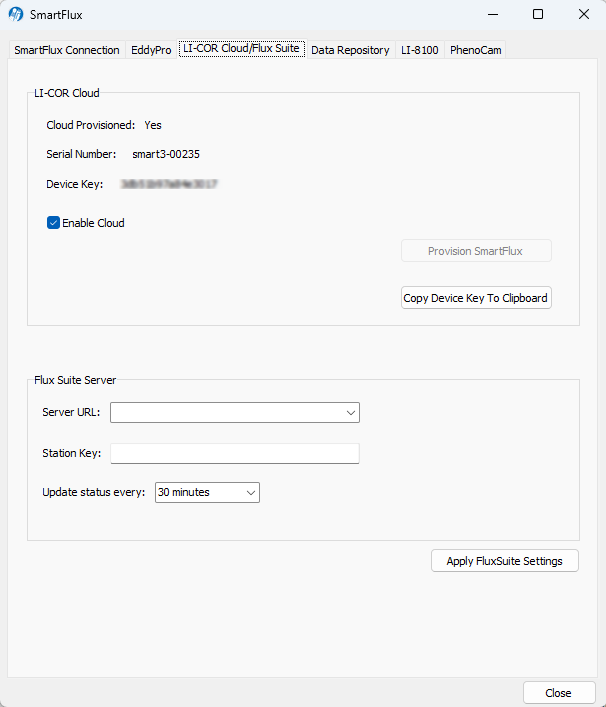
The interface indicates if this device has been provisioned for LI-COR Cloud. If it has been provisioned, you'll see Yes and the device key. If not, click Provision SmartFlux. The application will prompt LI-COR Cloud to create a key (internet access required) and then display the key. The Enable Cloud box will become active.
-
Check the Enable Cloud box.
-
Copy the Device Key to your clipboard.
-
Close the window.
-
-
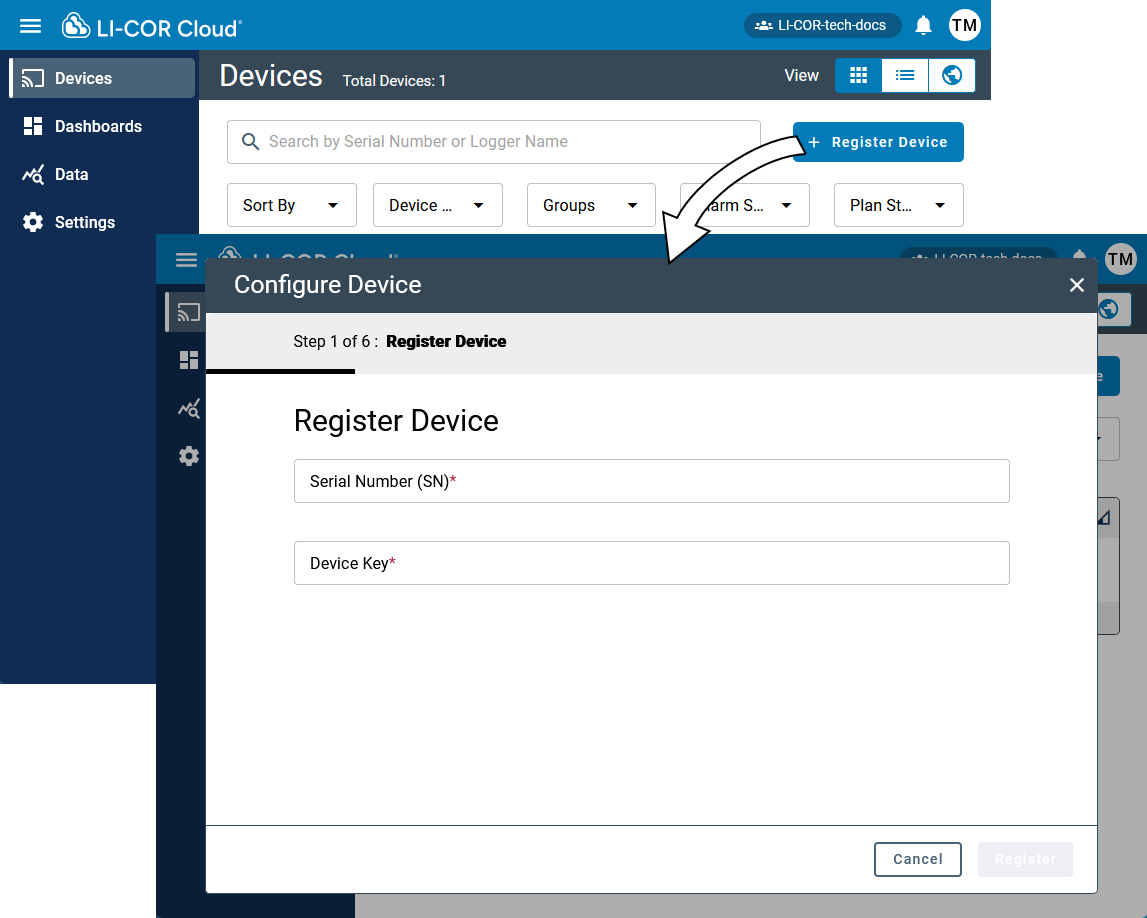
Return to LI-COR Cloud and select Register Device.
-
Enter the SmartFlux Core System Serial Number and Device Key.
After LI-COR Cloud acknowledges the device, click Next.
-
Activate a data plan.
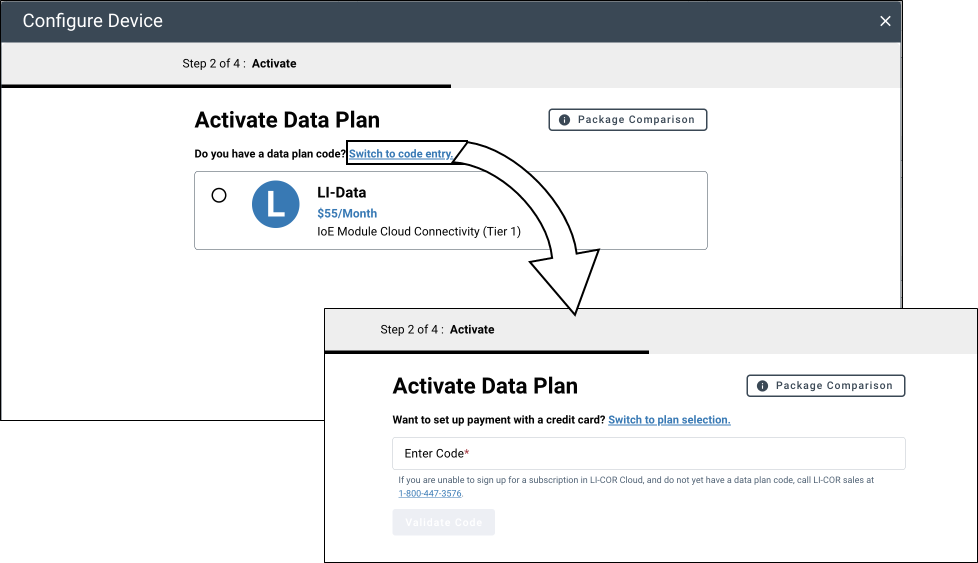
You can subscribe to LI-COR Cloud by setting up monthly payments with a credit card or you can purchase a coupon code for terms of one year or more. If you purchase a coupon code, it will be emailed separately from the purchase order. The subscription information is entered in the device registration process.
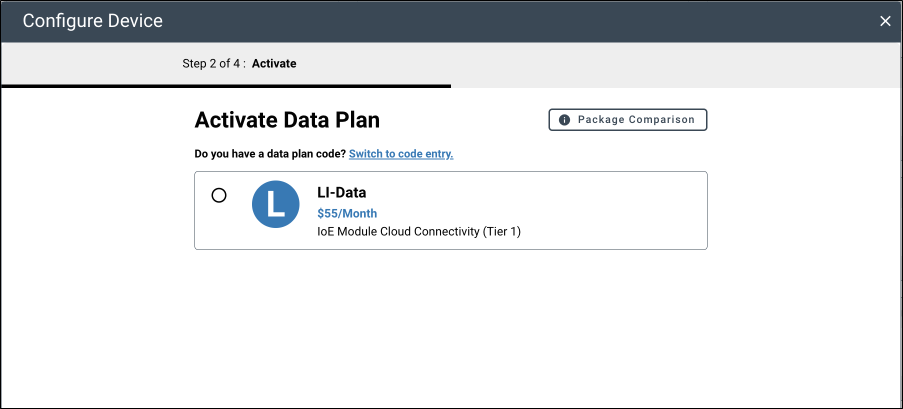
Alternatively, if you have a coupon code, Switch to code entry and enter the code that was provided with your order.
-
Fill in any additional information and complete registration.
-
Save the settings.
The eddy covariance system is now registered with LI-COR Cloud and the data plan is active.
Connecting to a data repository
The Data Repository tab is where you configure the eddy covariance system to push data to a server. You can push raw data (lots of data), complete EddyPro results (a moderate amount of data), or daily summary files (a small amount of data).

The options available include:
Transfer data to a remote repository: Check this box to enable transfer.
Data Server: Here you enter the Server URL and login credentials. In the Server URL: field, you have some options that enable you to specify which data should be transferred.
Suitable URLs:
- https://server-address
- sftp://server-address/path/$(filename)
- ftp://server-address/path/$(filename)
In the examples above, the server-address is the URL of the server where SmartFlux will transfer data. Depending on how the server is set up, the path may or may not be needed.
SmartFlux expects the server to ask for a username and password, so they are mandatory fields.
Depending on the server implementation, you may want to add other information onto the path of the URL. When any of the items below are added to the URL, SmartFlux will replace the $(variable) with the corresponding value. For example, $(hostname) is replaced with the hostname of the SmartFlux.
| Information | Description |
|---|---|
| $(checksum) | MD5 sum of the file being uploaded |
| $(filename) | The name of the file being uploaded |
| $(fullname) | The name of the file including the path |
| $(hostname) | SmartFlux hostname |
| $(timestamp) | Data collection start time |
| $(endtimestamp) | Data collection end time |
Some examples follow:
- sftp://192.168.100.100/$(filename)
- sftp://192.168.100.100/home/station/$(filename)
- https://some_url.com/upload/etc/$(md5)/$(filename)
File Types: The types of files that are sent to the server can be a combination of the raw data file (.ghg), the full EddyPro output package for each processing period, or a file that contains the daily EddyPro output summaries.
Alternately, if you wish to submit files in the format specified by the ICOS network, choose the ICOS CSV option.
The file name for the ICOS CSV file needs to be specified in the following format:
#[SiteID]_EC_$(endtimestamp)_L#[logger_number]_F#[file_number].csv
- The fields indicated by #[…] must be edited by the user
- The fields indicated by $(variable) are dynamically created by the software
- The text in bold typeface must not be modified
For example, for Site ID XYZab, Logger Number 1, and File Number 2, the file name template must be:
XYZab_EC_$(endtimestamp)_L1_F2.csv
Connecting an LI-8100A system
Connecting an LI-8100A systemTo connect an LI-8100A to the eddy covariance system and make the data available on LI-COR Cloud, enter the LI-8100A IP address in the field labeled Hostname. Click Apply 8100 Settings after entering the Hostname.

Verify the configuration
After completing the configuration, verify the system in the win-GHG dashboard.
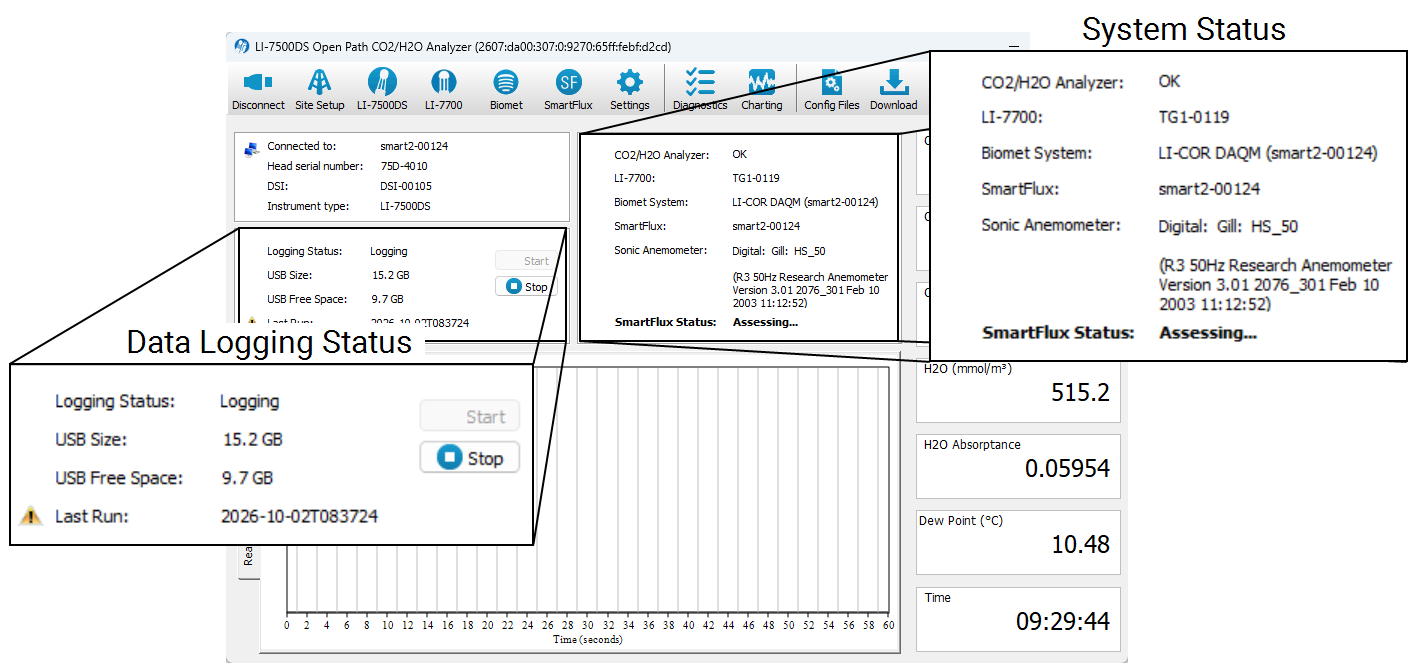
System status
The status pane provides the following details:
Note: The warning symbol ( ) next to any component indicates that it is in need of attention. Often it indicates that the software configuration and detected hardware are inconsistent. Start by confirming that data cables are connected, power supplies are on, and then check the software configuration.
-
CO2/H2O Analyzer: Status of the CO2/H2O gas analyzer (OK typically).
-
LI-7700: Status of the LI-7700 Open Path CH4 Analyzer. Serial Number of the instrument, if connected; otherwise None.
-
Biomet System: Status of the Biomet System, if installed. Serial Number if connected. Otherwise, None.
-
SmartFlux: Serial Number of the SmartFlux Core System.
-
Sonic Anemometer: Indicates the status of the sonic anemometer. For most models the software indicates: digital, model, make, and sampling configuration. Some models provide more details.
-
SmartFlux Status: None if not connected; OK of good; Assessing if unknown; Issues detected if an error is detected.
Data logging status
The logging pane describes data storage and processing:
-
Logging Status: Indicates Logging or Not logging.
-
USB Size: Total capacity of the USB drive on the SmartFlux Core System.
-
USB Free Space: Available capacity on the USB drive.
-
Last Run: Status of the last half-hour flux processing by EddyPro on the SmartFlux Core System. Gives the most recent date and time when data collection began with a link to download the results (direct connection required). A warning symbol (
) indicates that EddyPro data processing was unsuccessful. -
Start: Starts logging.
-
Stop: Stops logging.
Diagnostics
Also check the system diagnostics under Diagnostics > SmartFlux tab.


Note: Diagnostics are updated every 15 seconds except when the SmartFlux Core System is executing an EddyPro run, as indicated by a banner:

Diagnostics refresh at the conclusion of the run (typically 7 to 15 minutes).
If issues are indicated, go through the hardware and software configuration and then review Troubleshooting.
After verifying the connections, you'll complete the hardware installation (Field installation), complete the configuration (Configuring the eddy covariance system), and verify the flux computations(Verifying flux computations).
If issues are indicated, go through the hardware and software configuration and then review Troubleshooting.
After verifying the connections, you'll complete the hardware installation (Field installation), and complete the configuration (Configuring the eddy covariance system), and verify the flux computations, as described in Verifying flux computations.