Settings
Organization settings
Organization settings allow you to specify a number of export format settings that LI-COR Cloud uses when generating all exports. LI-COR Cloud uses these settings for both on-demand and scheduled exports (see Creating an on-demand export or Creating a scheduled export). You can override some settings when creating a specific export, such as file format and time zone, but some settings cannot be overridden at the individual export level.
Export format settings
You can set some parameters for the data file created in the export process.
 Learn more

-
Default File Format: Select to export to a CSV or XLSX.
-
Time Format: Select from 12- or 24-hour format.
-
Column Separator: Select from Tab, Comma (,), or Semicolon (;).
-
Default Time Zone: Select your time zone from the list.
-
Date Format: Select from M D Y, D M Y, or Y M D.
-
Positive # Format: Select how you want positive numbers to appear in the export.
-
Date Sample: Displays how your selections for Time Format, Date Format, and Date Separator appear in the export.
-
Negative # Format: Select how you want negative numbers to appear in the export.
-
Date Separator: Select Slash (/) or Dash (-).
-
Separate date and time into two columns: Displays the date and time in separate columns.
-
Include line number in column: Adds a first column that numbers the rows.
-
Include labels in column header if available: Displays the labels you have named your measurements (if you have provided them) in the column header.
-
Include serial number in column header if available: Displays the serial number of the device in the column header.
-
Include export settings in header: Displays the settings you select on this page in the column header.
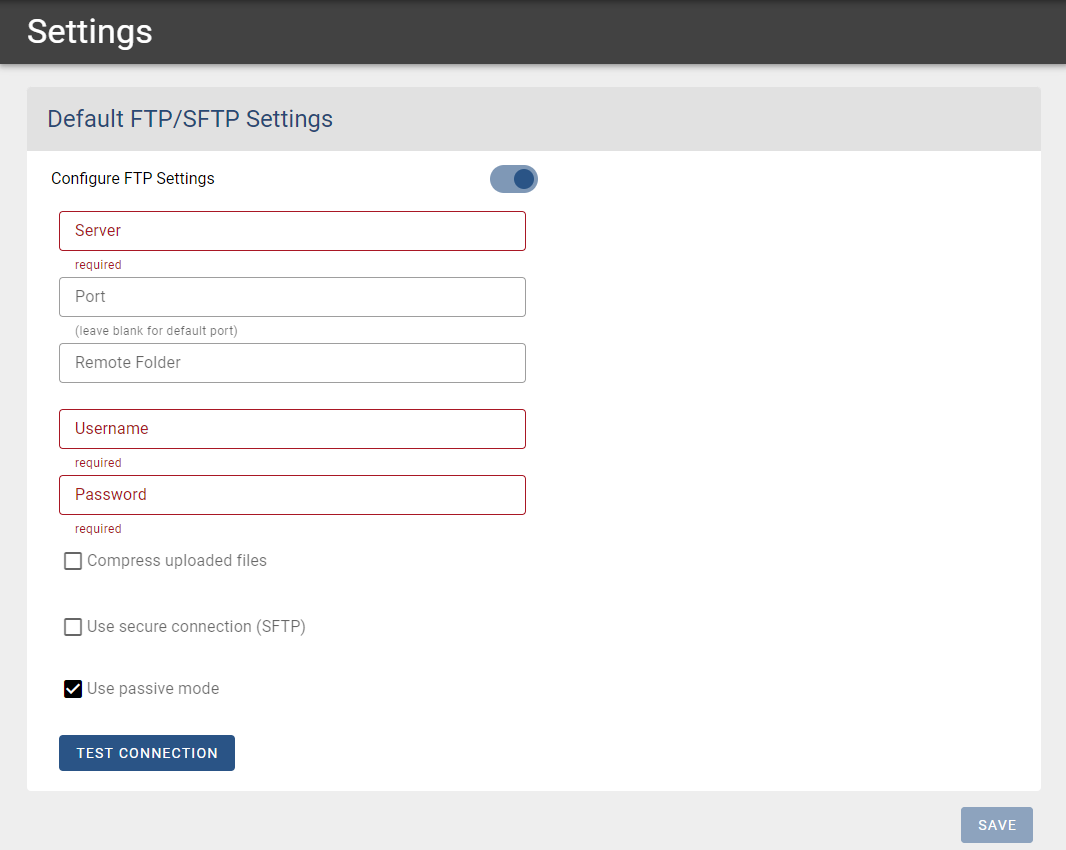
Default FTP/SFTP settings
Use the fields at the bottom of the Settings page to specify FTP/SFTP settings that LI-COR Cloud uses to communicate with your server. LI-COR Cloud uses these settings as the default for on-demand and scheduled exports delivered using FTP/SFTP. You can specify settings specific to an export while you are setting it up.
Learn more
-
Click the slider to turn on Configure FTP Settings.
This exposes the FTP Settings.
-
Complete the required fields and any optional fields you need.
- Server: The address of your FTP server. Enter a valid host name. You can use a valid public IP address or a URL.
- Port: The port your server uses to communicate. Leave this blank to use the default port.
- Remote Folder: The folder on the server where you want to place your data. Folders beginning with a slash (/) are root directory paths. Folders without a slash are relative to your home directory.
- Username: Your username on the server.
- Password: Your password on the server.
- Compress uploaded files: Tells LI-COR Cloud to compress the files that it sends.
- Use secure connection (SFTP): Tells LI-COR Cloud that you want to send data using a secure connection. If you select this option, also select Use certificate if the server uses a digital certificate for authentication.
- Use passive mode: Tells LI-COR Cloud to use passive mode when making the connection (necessary if the server is running behind a firewall). This setting is not available when LI-COR Cloud is using a secure connection.
-
Click Test Connection to test the settings you've entered.
-
Click Save to save your settings.
Setting up the SFTP certificate
When you check Use secure connection (SFTP), LI-COR Cloud uses public key authentication. These instructions help you install the LI-COR Cloud-generated public key on your OpenSSH server. If your SSH server uses other software or you are not authorized to log in to the server, consult your IT administrator for help.
Learn more
-
Log into the SSH server.
-
Go to the
.sshsubdirectory of your account's home directory or create one, if needed.You may need to enable show hidden files if you are unable to view the
.sshdirectory. The recommended permissions for the.sshdirectory is 700. -
Open the authorized_keys file or create one, if needed.
The recommended permissions for the file is 600.
-
In LI-COR Cloud, select Settings and complete all the SFTP fields in Default FTP/SFTP Settings.
-
Check the Use certificate box.
-
Copy the entire contents of the Public Key field to your clipboard.
-
Return to the authorized_keys file and paste the key into the file.
Make sure all the text from copied key is in one line and save the file.
-
Be sure your account home directory, your
.sshsubdirectory, and the authorized keys file are not group-writable or world-writable. -
In LI-COR Cloud, click Test Connection.
-
Click Save to save the SFTP settings.
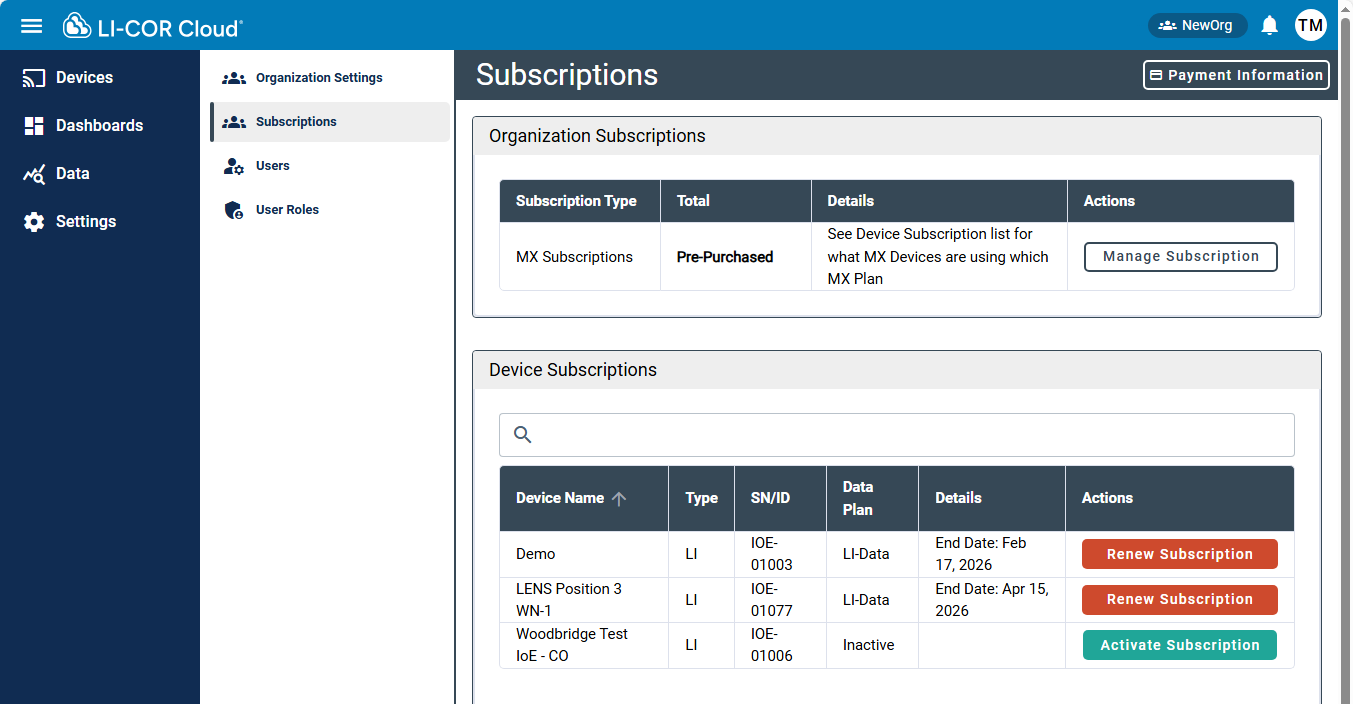
Subscriptions
You have the option to subscribe to a data plan when registering a device. You also can activate and manage your subscriptions any time under Settings > Subscriptions. Subscriptions are based on an organization or device. Review subscription options for more details.
-
Payment Information: If you are an administrator for the organization, you can enter or change the payment information.
-
Manage Subscription: Add payment details, select a plan, and enroll in MX subscriptions.
-
Renew Subscription: Renew or update subscription details.
-
Activate Subscription: When getting started, you can enter payment details, select a plan, and manage the subscription.
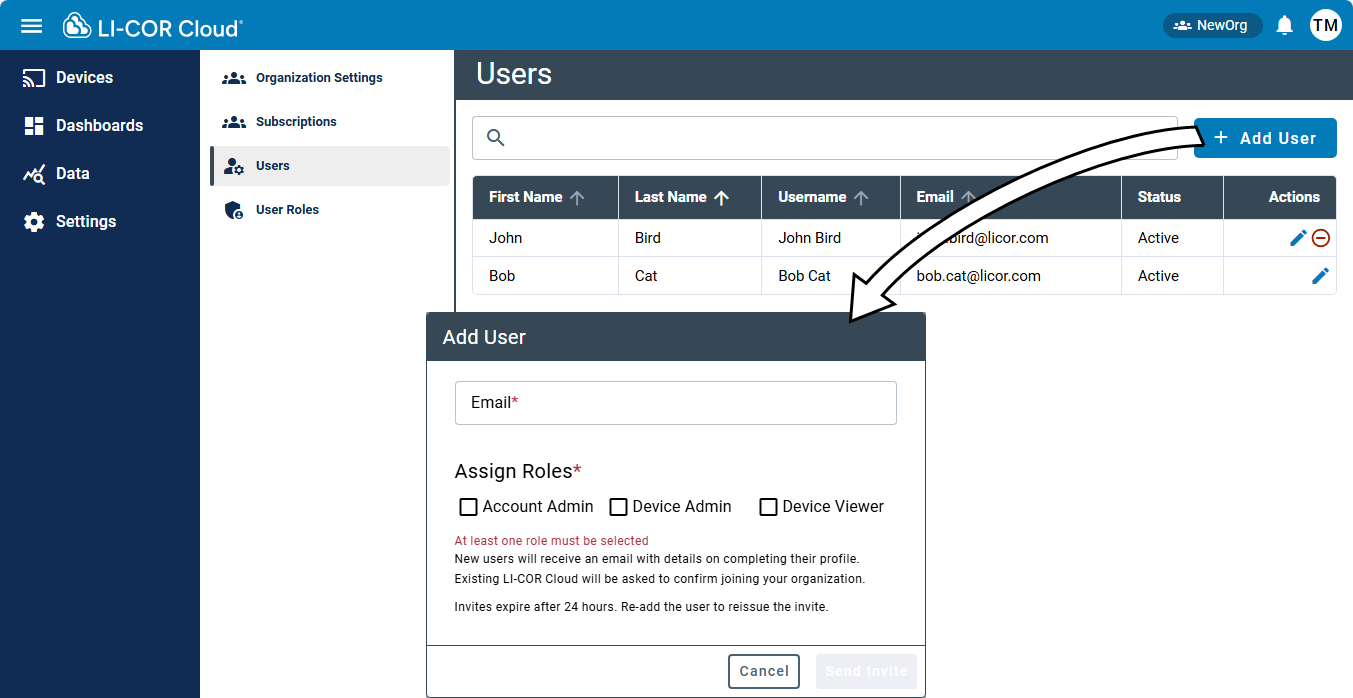
Users
Under Settings > Users, you can add users, remove users, edit user first and last names, and edit email addresses.
Adding a new user
When you add a user, you are adding them to your current Organization. Users can belong to more than one Organization.
To add a user, all you need is an email address.
-
Click + Add User.
-
Enter the user Email Address.
-
Select a Role or Roles.
See User roles for more information.
-
Click Send Invite.
LI-COR Cloud sends an email to the added user. The recipient must click the link in the email to accept the invitation. Resend Invite is available only when a user has been invited but has not yet accepted the invitation.
Note: Adding a user invites that user to the organization. New users complete their account details as part of accepting the invitation. If you are inviting an existing LI-COR Cloud user, use the same email address for the existing LI-COR Cloud account. If you use a different email address, LI-COR Cloud creates a new account and does not link the two accounts.
Removing a user
Click the delete button ![]() to deactivate a user. Deactivation removes the user's access to the current organization. Deactivation does not affect the user's access to any other organization.
to deactivate a user. Deactivation removes the user's access to the current organization. Deactivation does not affect the user's access to any other organization.
Deactivate is not available for the user currently assigned as the Account Owner. The Account Owner must transfer their role to another user before deactivating themselves.
User roles
Settings > User Roles gives access to user roles, where you can extend or revoke permissions. Users can be part of more than one organization and a user can have different roles in different organizations. Users must have at least one role, but can have more than one role at a time. A green check mark indicates that the user has that role; a red X means that the user does not have that role.
-
Account Owner: This role is not visible in the Add User dialog and is assigned to the first user to create an account in this Organization. The Account Owner can perform any task available in the system. Only one user in an Organization can be the Account Owner.
-
Account Admin: Account administrators have access to users and user roles, as well as billing and plan management. If this is your only role in LI-COR Cloud, you have access to the Account tab, but cannot see Devices, Dashboards, and Data.
-
Device Admin: Device Administrators have access to the Devices, Dashboards, Data, Settings tabs and can complete any action on those tabs. This automatically turns on the Device Viewer role. Cannot see user or role information.
-
Device Viewer: Device viewers have view-only access to Devices, Dashboards, Data, and Settings. Device Viewers can create and edit exports, but cannot edit configurations or see user or role information.
Editing user roles
To edit a user role:
-
Under Settings > User Roles, identify the user to edit and select Edit from the menu at the right.
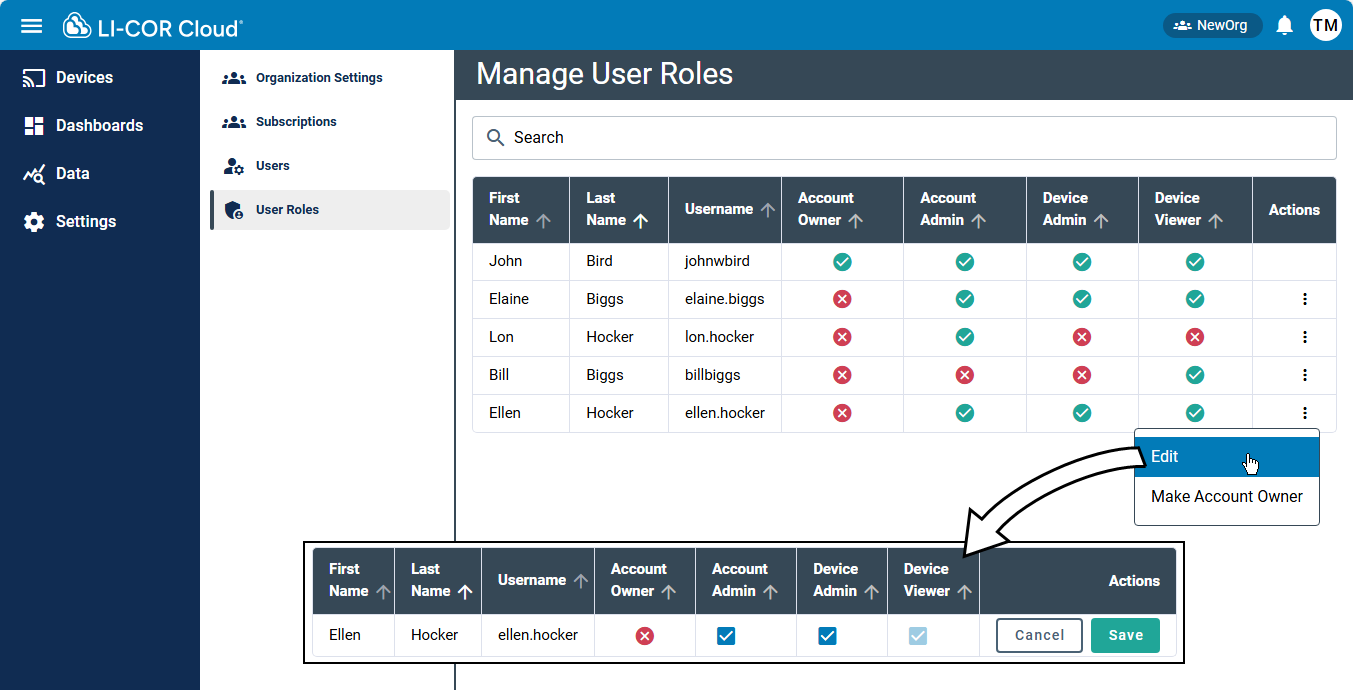
The page displays boxes that you can check or clear to change the roles.
-
Check or clear roles for the user.
-
Click Save when you are done editing roles.
Reassigning account ownership
If you need to change the user who owns the account for your organization, in the Actions column for the new owner, expand the menu and select Make Account Owner. When prompted, confirm that you want to make this change.